On Instagram, when uploading a photo, the default setting is a square layout. Having a square space for your photo is fine, if the photo you are trying to upload fits nicely in this box.
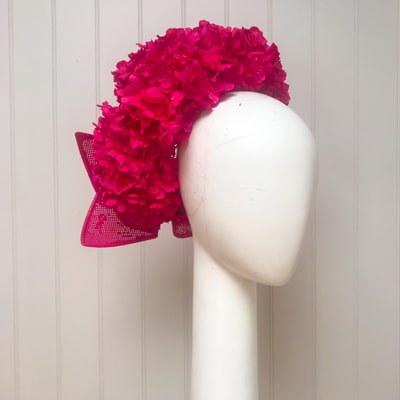
Image: @clairehahnmillinery. A square photo like this would fit perfectly into the default Instagram photo size without any resizing needed.
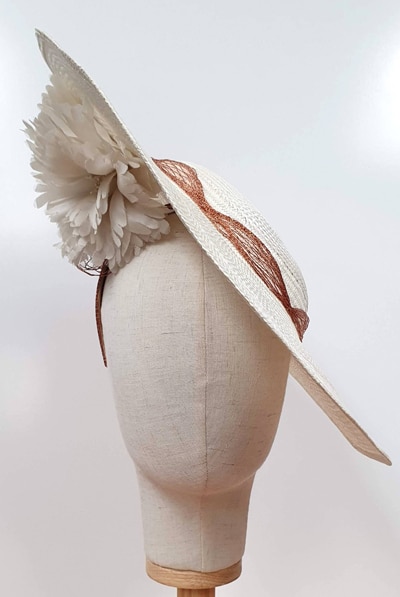
Image: Cessiah Alice Millinery
Luckily, Instagram allows you to resize the image by placing two fingers on your phone screen and pinching them together. This way you can post your image as a portrait photo, allowing more of the hat to fit in the screen.
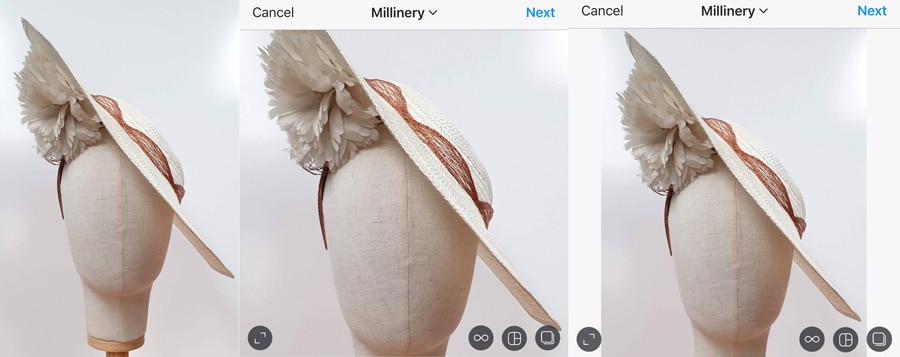
Left to Right: Original Photo > Photo once put into Instagram to upload (default square) > Photo once resized using pinch motion
Luckily, there are apps you can use to help you resize the photo so it fits nicely in Instagram. My favourite app to use is called ‘Snapseed’. It is free to download from the app store.
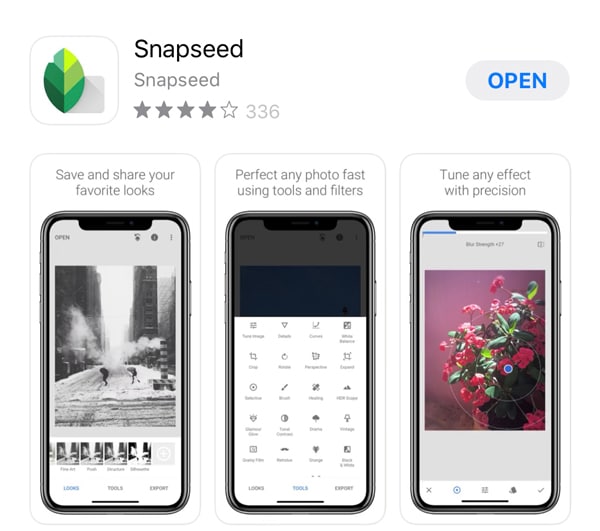
Once you have installed the app, here’s how you use it to resize a photo.
On the top left hand side tap on ‘open’.

Select the photo you wish to resize from your camera roll.
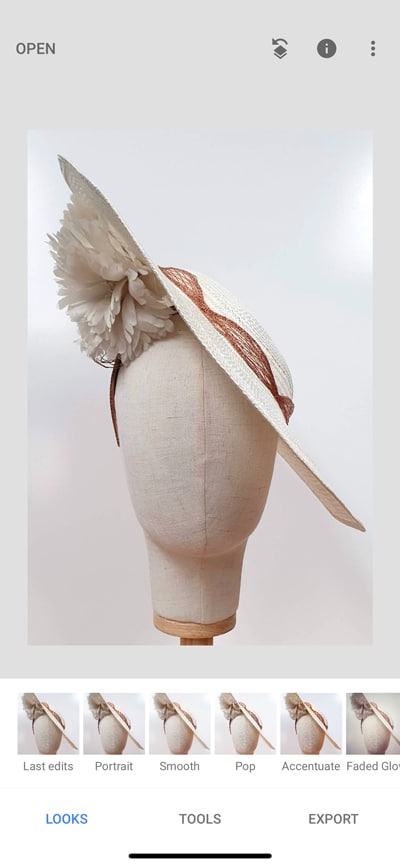
Tap on ‘Tools’ then ‘Expand’.
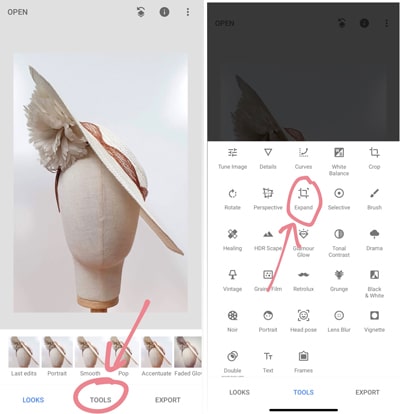
Use your finger to slide the left side of the photo out a few millimeters. Then do the same for the right side. You’ll notice the background is a little grid which will help you keep the expanded areas even.
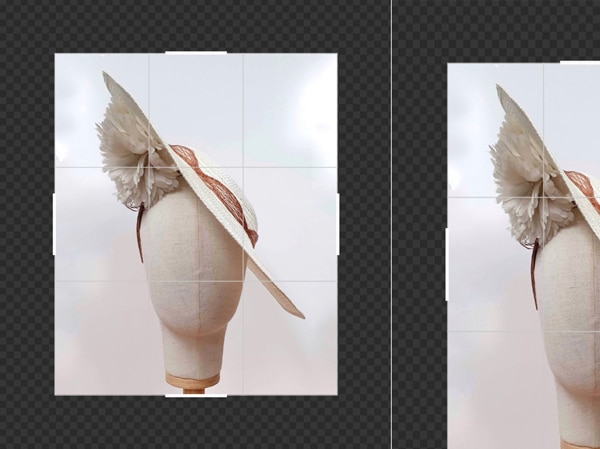
If you expand the left side 4 squares, expand the right side 4 squares too.
The aim is to make your photo resemble a slightly rectangular square, as this will fit the whole photo in Instagram.
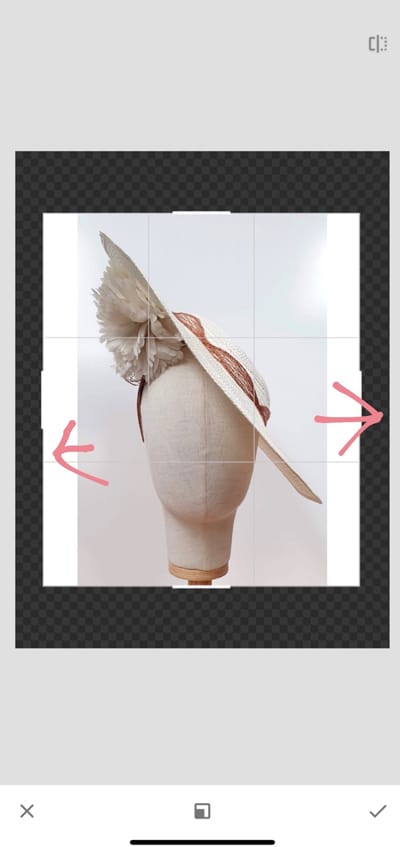
With the extra space you have added to each side, you have three options of either a ‘smart’, white or black background colour.
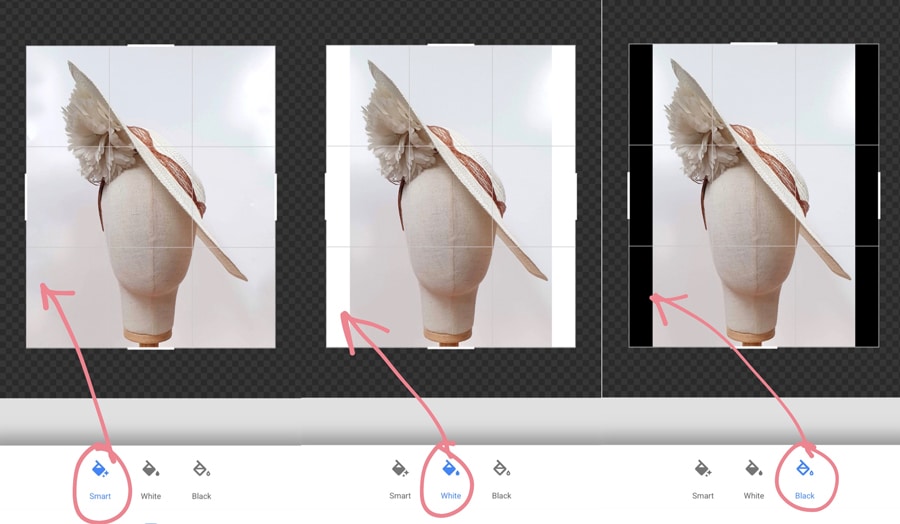
My favourite background is the ‘smart’ option, as this mimics the background that is already on the photo and makes the added space not noticeable and clean to look at.
This option doesn’t always work though, depending on what your background is. If the background is quite busy and not a plain one, then the mimic option can look very odd. And if your hat is too close to the sides then you will notice some of the hat gets repeated in the background. Here is an example:
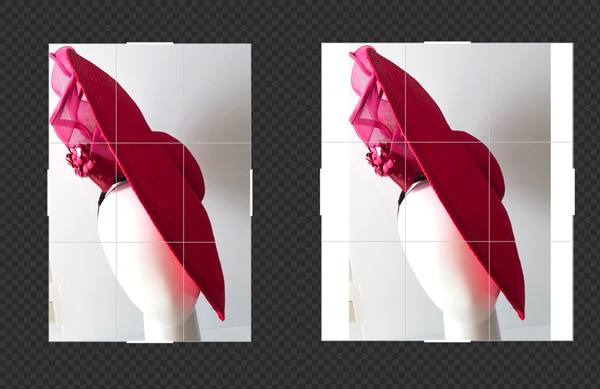
Image: Marjori Banks Millinery
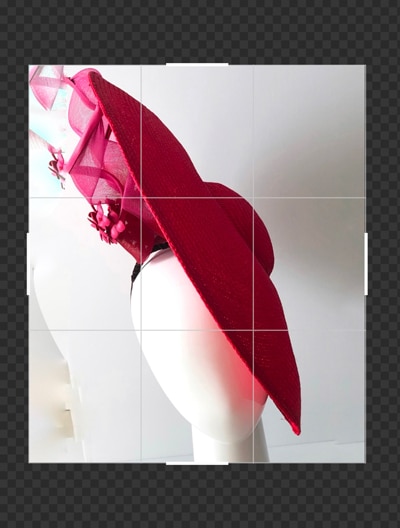
In the case the ‘smart’ background doesn’t work, you can use ‘white’. The white background looks clean cut and fresh. Of course you can also use black, if this is inline with your instagram feed and doesn’t look out of place or overpowering.
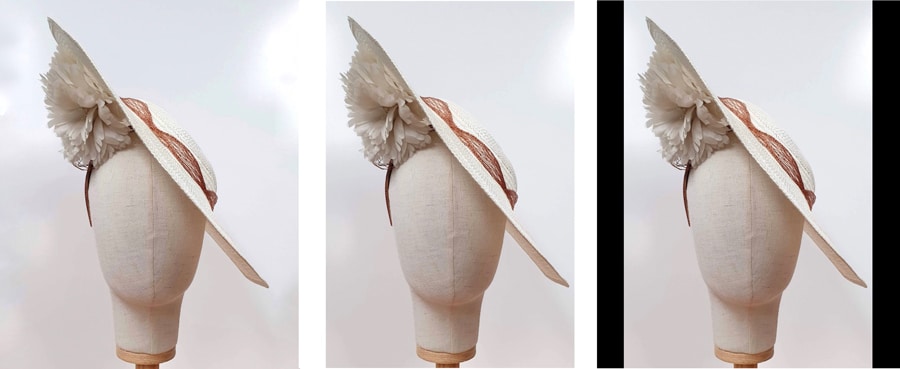
Smart | White | Black
Once you are happy with your background, on the bottom right hand of the screen tap on ‘Export’ and then ‘Save a copy’.
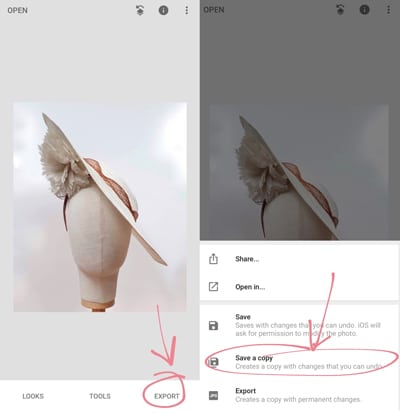
Your new photo will be saved to your camera roll and you can then go back into Instagram and post your new resized photo.
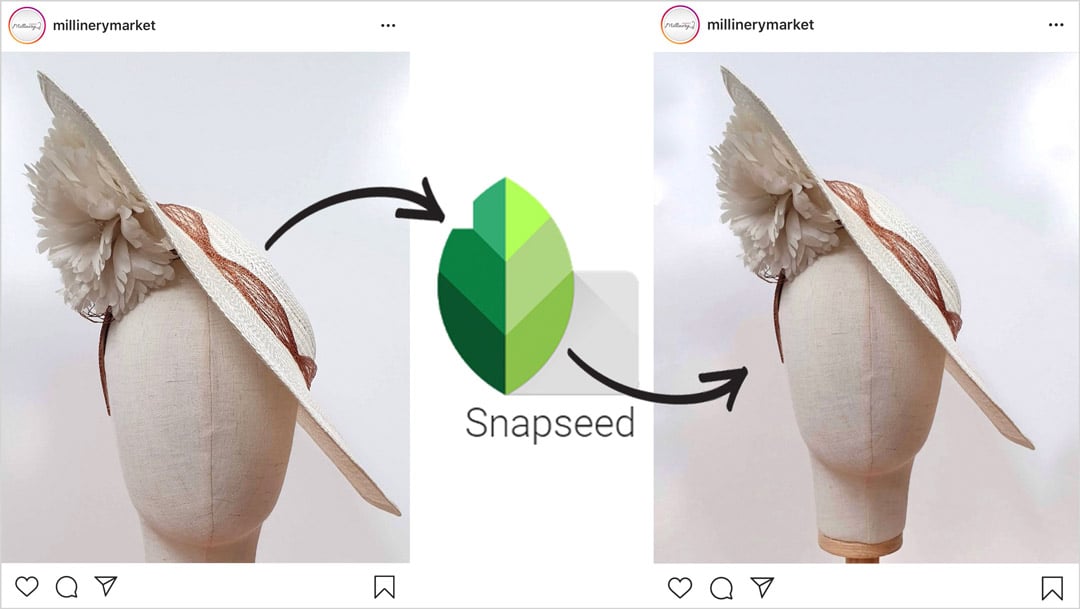
I love to have the first photo of a hat showing the whole top to bottom of the hat and the mannequin as this is more visually appealing. You can add multiple photos to your instagram uploads which can then include close up details of your hat and its features.
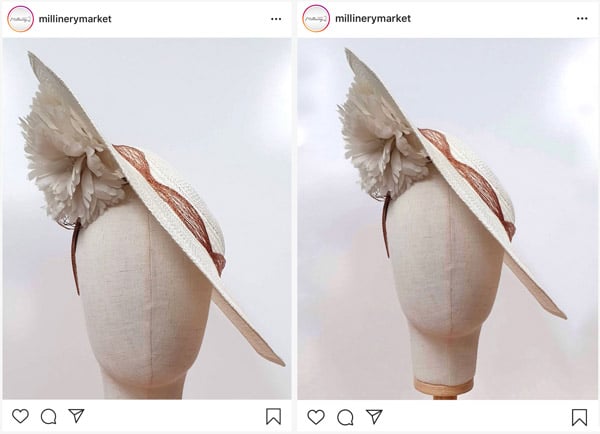
Left: the photo as is | Right: photo resized using Snapseed.
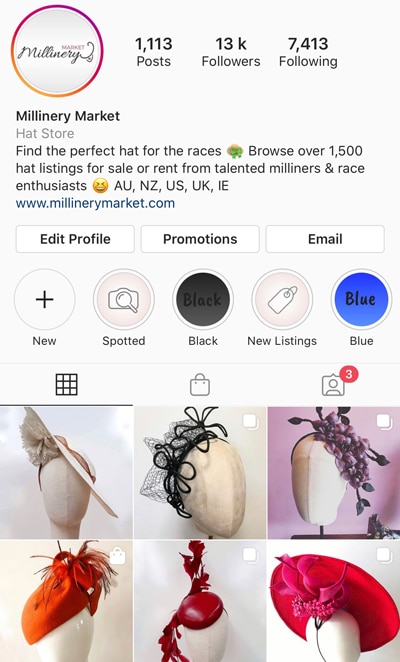
Note even if you post a tall image, it will be cropped to a square on your feed as this is the standard layout, but in the newsfeed and once someone opens the image, it will be the tall portrait image.
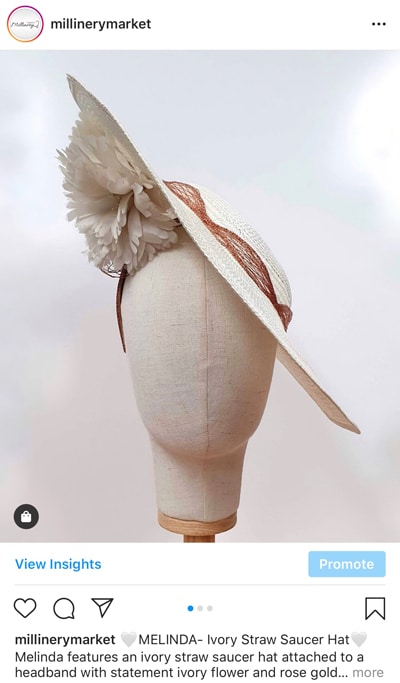
And that is how you resize an image for your Instagram feed. I hope you found this post helpful.
Pro tip: If you prefer to edit your photos in Photoshop, you can achieve the same thing as the ‘smart’ expand feature in Snapseed by extending your canvas, selecting the newly added area and then going to ‘Edit > Fill’ and choosing the ‘Content Aware’ option. Here’s a post that gives an example using Photoshop.
Do you have any tips or apps you use to post beautiful millinery photos to Instagram? Share them in the comments below!
Lavender Button 💜 AU$70/week
Available at www.millinerymarket.com/en/listings/555711
.
.
.
#millinery #hats #hathire #millinerysale #hatrental #hatsforsale #millinerylove #millinerydesign #hatlover #headwear #springracing #melbournecup #springcarnival #racedaystyle #fascinators #headpieces #hatsofinstagram #fashionheadwear #millinerytrends #hatobsession #hat #millinerymarket #millineryhire #derbyday #oaksday #fascinator #fascinatorhire #boaterhat #flowercrown
Oct 27

Floating Rose 🩷💗 AU$359
An exquisite floating headpiece embellished with delicate baby pink sinamay roses, accented by center crystals and adorned with soft goose feather leaves. The piece is bordered with a beautiful starbright braid, providing a dazzling finishing touch.
Available at www.millinerymarket.com/en/listings/555638
.
.
.
#millinery #hats #hathire #millinerysale #hatrental #hatsforsale #millinerylove #millinerydesign #hatlover #headwear #springracing #melbournecup #springcarnival #racedaystyle #fascinators #headpieces #hatsofinstagram #fashionheadwear #millinerytrends #hatobsession #hat #millinerymarket #millineryhire #derbyday #oaksday #fascinator #fascinatorhire #boaterhat #flowercrown
Oct 16

Black Beauty 🖤🤍🖤 AU$325
Its so fine because of the shine.....Front facing percher with the most amazing sparkle from the black braid. Black and white flowers just add to the drama.
Available at www.millinerymarket.com/en/listings/554950
.
.
.
#millinery #hats #hathire #millinerysale #hatrental #hatsforsale #millinerylove #millinerydesign #hatlover #headwear #springracing #melbournecup #springcarnival #racedaystyle #fascinators #headpieces #hatsofinstagram #fashionheadwear #millinerytrends #hatobsession #hat #millinerymarket #millineryhire #derbyday #oaksday #fascinator #fascinatorhire #boaterhat #flowercrown
Oct 13

Bridgette 🤍🖤🤍 AU$355
Black and ivory front percher, hand beaded with glitter leaf trim. Perfect Autumn/Winter millinery. Lightweight and easy to wear custom headband. Run don’t walk for this one ➡️ 🖤
Available at www.millinerymarket.com/en/listings/555226
.
.
.
#millinery #hats #hathire #millinerysale #hatrental #hatsforsale #millinerylove #millinerydesign #hatlover #headwear #springracing #melbournecup #springcarnival #racedaystyle #fascinators #headpieces #hatsofinstagram #fashionheadwear #millinerytrends #hatobsession #hat #millinerymarket #millineryhire #derbyday #oaksday #fascinator #fascinatorhire #boaterhat #flowercrown
Oct 13

Black and White Boater Hat 🖤🤍🖤 AU$360
This black and white boater hat is ideal for race wear, especially Derby Day.
It is worn as a percher and measures approximately 40cm (15.5 inches) across. This style suits most face shapes and is comfortable to wear.
It is positioned on the head with hat elastic.
Available at www.millinerymarket.com/en/listings/555651
.
.
.
#millinery #hats #hathire #millinerysale #hatrental #hatsforsale #millinerylove #millinerydesign #hatlover #headwear #springracing #melbournecup #springcarnival #racedaystyle #fascinators #headpieces #hatsofinstagram #fashionheadwear #millinerytrends #hatobsession #hat #millinerymarket #millineryhire #derbyday #oaksday #fascinator #fascinatorhire #boaterhat #flowercrown
Oct 13

Pink Roses 💓 AU$50/week hire
Three handmade pink cotton roses adorn a wide pink headband.
Available at www.millinerymarket.com/en/listings/555561
.
.
.
#millinery #hats #hathire #millinerysale #hatrental #hatsforsale #millinerylove #millinerydesign #hatlover #headwear #springracing #melbournecup #springcarnival #racedaystyle #fascinators #headpieces #hatsofinstagram #fashionheadwear #millinerytrends #hatobsession #hat #millinerymarket #millineryhire #derbyday #oaksday #fascinator #fascinatorhire #boaterhat #flowercrown
Oct 12

Hot Pink Dior Brim Hat 🩷 AU$360
This Hot Pink Dior Brim Hat is an elegant choice that’s ideal for race wear.
It is worn as a percher and measures approximately 40cm (15.5 inches) across. This style suits most face shapes and is comfortable to wear.
It is positioned on the head with hat elastic.
Available at www.millinerymarket.com/en/listings/555650
.
.
.
#millinery #hats #hathire #millinerysale #hatrental #hatsforsale #millinerylove #millinerydesign #hatlover #headwear #springracing #melbournecup #springcarnival #racedaystyle #fascinators #headpieces #hatsofinstagram #fashionheadwear #millinerytrends #hatobsession #hat #millinerymarket #millineryhire #derbyday #oaksday #fascinator #fascinatorhire #boaterhat #flowercrown
Oct 12

Beaded Shell Flower Crown ~ Pink & Green 🩷💚 AU$65/week hire
A stunning combination of pink and green shell beads and glass pearl beads have been used to create the beautiful beaded flowers on this piece. Flowers are attached to a metallic gold structure with a comb to assist with holding headpiece in place.
*please note as shells are a natural product please allow some slight colour variation in the beads.
Available at www.millinerymarket.com/en/listings/555559
.
.
.
#millinery #hats #hathire #millinerysale #hatrental #hatsforsale #millinerylove #millinerydesign #hatlover #headwear #springracing #melbournecup #springcarnival #racedaystyle #fascinators #headpieces #hatsofinstagram #fashionheadwear #millinerytrends #hatobsession #hat #millinerymarket #millineryhire #derbyday #oaksday #fascinator #fascinatorhire #boaterhat #flowercrown
Oct 12

Butter Yellow Floral Headband 💛 AU$365
Here comes the sun! Butter yellow wide sinamay headband with a stunning array of lemon and butter yellow feather flowers. On an easy to wear velvet covered headband.
Available at www.millinerymarket.com/en/listings/555635
.
.
.
#millinery #hats #hathire #millinerysale #hatrental #hatsforsale #millinerylove #millinerydesign #hatlover #headwear #springracing #melbournecup #springcarnival #racedaystyle #fascinators #headpieces #hatsofinstagram #fashionheadwear #millinerytrends #hatobsession #hat #millinerymarket #millineryhire #derbyday #oaksday #fascinator #fascinatorhire #boaterhat #flowercrown
Oct 12

Magenta Feather Burst Percher💞 AU$495
A rich magenta parisisal base adorned with an explosion of hand cut magenta, and mauve feather flowers and floating feathers.
Elastic and comb.
Available at www.millinerymarket.com/en/listings/555552
.
.
.
#millinery #hats #hathire #millinerysale #hatrental #hatsforsale #millinerylove #millinerydesign #hatlover #headwear #springracing #melbournecup #springcarnival #racedaystyle #fascinators #headpieces #hatsofinstagram #fashionheadwear #millinerytrends #hatobsession #hat #millinerymarket #millineryhire #derbyday #oaksday #fascinator #fascinatorhire #boaterhat #flowercrown
Oct 12

Cornflower Mist Percher 💙🩵 AU$495
A stunning vintage racello straw has been hand dyed and picks up colours of cornflower and lilac. This provided inspiration for the Cobalt, Cornflower and Lilac feather flowers with a mist of super fine veiling to finish.
Available at www.millinerymarket.com/en/listings/555553
.
.
.
#millinery #hats #hathire #millinerysale #hatrental #hatsforsale #millinerylove #millinerydesign #hatlover #headwear #springracing #melbournecup #springcarnival #racedaystyle #fascinators #headpieces #hatsofinstagram #fashionheadwear #millinerytrends #hatobsession #hat #millinerymarket #millineryhire #derbyday #oaksday #fascinator #fascinatorhire #boaterhat #flowercrown
Oct 12

Madeline Saucer in pink straw with white edge Spring Racewear 💗 AU$580
Madeline Saucer is a curved saucer shape that is finished with a chic white lace straw edge. This style is one size fits all and is secured to the head with a shaped wire headband, elastic and comb.in pink straw with white edge Spring Racewear Headpiece.
Available at www.millinerymarket.com/en/listings/555587
🩷
.
.
.
#millinery #hats #hathire #millinerysale #hatrental #hatsforsale #millinerylove #millinerydesign #hatlover #headwear #springracing #melbournecup #springcarnival #racedaystyle #fascinators #headpieces #hatsofinstagram #fashionheadwear #millinerytrends #hatobsession #hat #millinerymarket #millineryhire #derbyday #oaksday #fascinator #fascinatorhire #boaterhat #flowercrown
Oct 11

Cristina front of the head pillbox in pale pink with a knot 🤍 AU$480
The Cristina headpiece is a front-of-head angular shape with a knotted trim in a pale pink straw. This style is one size fits all and is secured to the head with a shaped base, elastic and comb.
Available at www.millinerymarket.com/en/listings/555579
.
.
.
#millinery #hats #hathire #millinerysale #hatrental #hatsforsale #millinerylove #millinerydesign #hatlover #headwear #springracing #melbournecup #springcarnival #racedaystyle #fascinators #headpieces #hatsofinstagram #fashionheadwear #millinerytrends #hatobsession #hat #millinerymarket #millineryhire #derbyday #oaksday #fascinator #fascinatorhire #boaterhat #flowercrown
Oct 11

Monique Saucer in Textured Straw Silk Poppy Flower Trim in Red❤️ AU$620
The Monique Sauver is a gently curved saucer shape finished with matching patent braid on the under edge leaving a smooth top and rich silk poppies that are hand-crafted in-house. This style is one size fits all and is secured to the head with a shaped wire headband, elastic and comb.
Available at www.millinerymarket.com/en/listings/555594
.
.
.
#millinery #hats #hathire #millinerysale #hatrental #hatsforsale #millinerylove #millinerydesign #hatlover #headwear #springracing #melbournecup #springcarnival #racedaystyle #fascinators #headpieces #hatsofinstagram #fashionheadwear #millinerytrends #hatobsession #hat #millinerymarket #millineryhire #derbyday #oaksday #fascinator #fascinatorhire #boaterhat #flowercrown
Oct 11

MISS NIKKI HEADPIECE 🤩💫⭐️🌟✨🩷 AU$340
Our Miss Nikki fascinator will always stand out in the crowd. She definitely is a showstopper! Miss Nikki features a metallic golden signature crest and hand made red, pink and purple flowers cascading down the right side of the face. She is a one off piece.
You can gently squeeze or stretch the headband to adjust to the tightness at which you would like to wear it. The small teeth at the front will hold it in place for all day wear.
Available at www.millinerymarket.com/en/listings/555632
.
.
.
#millinery #hats #hathire #millinerysale #hatrental #hatsforsale #millinerylove #millinerydesign #hatlover #headwear #springracing #melbournecup #springcarnival #racedaystyle #fascinators #headpieces #hatsofinstagram #fashionheadwear #millinerytrends #hatobsession #hat #millinerymarket #millineryhire #derbyday #oaksday #fascinator #fascinatorhire #boaterhat #flowercrown
Oct 10

Pink and Blue Flowers 💐 AU$70/week hire
A large pink peony is the focal point of this design, while the pale blue flowers and the freshness of the green leaves add to the beautiful spring colour pallet.
Available at www.millinerymarket.com/en/listings/555560
.
.
.
#millinery #hats #hathire #millinerysale #hatrental #hatsforsale #millinerylove #millinerydesign #hatlover #headwear #springracing #melbournecup #springcarnival #racedaystyle #fascinators #headpieces #hatsofinstagram #fashionheadwear #millinerytrends #hatobsession #hat #millinerymarket #millineryhire #derbyday #oaksday #fascinator #fascinatorhire #boaterhat #flowercrown
Oct 10

Pink or blue? 🩷💙
Check out these stunning perchers for hire at @millinerymarket from @adorncollection.hire 😍
Available at www.millinerymarket.com/en/listings/555526
Oct 10

LOLA 🩵 AU$275
Soft blue headpiece adorned with hand made spray of flowers. Secured with elastic to the back of the neck.
Available at www.millinerymarket.com/en/listings/555495
.
.
.
#millinery #hats #hathire #millinerysale #hatrental #hatsforsale #millinerylove #millinerydesign #hatlover #headwear #springracing #melbournecup #springcarnival #racedaystyle #fascinators #headpieces #hatsofinstagram #fashionheadwear #millinerytrends #hatobsession #hat #millinerymarket #millineryhire #derbyday #oaksday #fascinator #fascinatorhire #boaterhat #flowercrown
Aug 19

LISA💛 AU$145
Lemon Swiss straw with swirls. Comfortable and easy to wear. Secured with elastic to the back of the neck.
Available at www.millinerymarket.com/en/listings/555493
.
.
.
#millinery #hats #hathire #millinerysale #hatrental #hatsforsale #millinerylove #millinerydesign #hatlover #headwear #springracing #melbournecup #springcarnival #racedaystyle #fascinators #headpieces #hatsofinstagram #fashionheadwear #millinerytrends #hatobsession #hat #millinerymarket #millineryhire #derbyday #oaksday #fascinator #fascinatorhire #boaterhat #flowercrown
Aug 19

Anna 🩷 AU$325
Stunning bright pink boater with matching satin ribbon and dramatic rear bow. Made from hand woven Panama straw. Brim 11cm wide. Size medium.
Available at www.millinerymarket.com/en/listings/555486
.
.
.
#millinery #hats #hathire #millinerysale #hatrental #hatsforsale #millinerylove #millinerydesign #hatlover #headwear #springracing #melbournecup #springcarnival #racedaystyle #fascinators #headpieces #hatsofinstagram #fashionheadwear #millinerytrends #hatobsession #hat #millinerymarket #millineryhire #derbyday #oaksday #fascinator #fascinatorhire #boaterhat #flowercrown
Aug 19

Roma ❤️ AU$255
Lovely piece designed to be worn on the right side of the head. Covered with fabric and trimmed with quills.
Available at www.millinerymarket.com/en/listings/555488
.
.
.
#millinery #hats #hathire #millinerysale #hatrental #hatsforsale #millinerylove #millinerydesign #hatlover #headwear #springracing #melbournecup #springcarnival #racedaystyle #fascinators #headpieces #hatsofinstagram #fashionheadwear #millinerytrends #hatobsession #hat #millinerymarket #millineryhire #derbyday #oaksday #fascinator #fascinatorhire #boaterhat #flowercrown
Aug 19

Lucy 🩵 AU$245
Soft blue headband adorned with hand made beaded flowers. Secured with elastic to the back of the neck.
Available at www.millinerymarket.com/en/listings/555496
.
.
.
#millinery #hats #hathire #millinerysale #hatrental #hatsforsale #millinerylove #millinerydesign #hatlover #headwear #springracing #melbournecup #springcarnival #racedaystyle #fascinators #headpieces #hatsofinstagram #fashionheadwear #millinerytrends #hatobsession #hat #millinerymarket #millineryhire #derbyday #oaksday #fascinator #fascinatorhire #boaterhat #flowercrown
Aug 19


Betty AU$145 🖤
Cream textured straw with black velvet underlay. Sits comfortably on the right side of the head. Held securely with elastic to the back of the head.
Available at www.millinerymarket.com/en/listings/555204
Jul 10

Canary 💛 AU$135
Textured straw headband with bead trim. Light and comfortable to wear. Held securely with elastic to the back of the head.
Available at www.millinerymarket.com/en/listings/555197
Jul 9

Sage Vine Facehugger US$160
This parisisal facehugger has been hand dyed to the perfect sage green color. It features a crinoline swirl and beautiful vine winding its way around the headpiece. A double wound elastic secures this piece to the head.
Available at www.millinerymarket.com/en/listings/555387
Jul 9

Alexis 💐 $295 AU
A golden headband adorned with hand painted and tooled leather flowers and leaves.
Available at www.millinerymarket.com/en/listings/555352
.
.
.
#millinery #hats #hathire #millinerysale #hatrental #hatsforsale #millinerylove #millinerydesign #hatlover #headwear #springracing #melbournecup #springcarnival #racedaystyle #fascinators #headpieces #hatsofinstagram #fashionheadwear #millinerytrends #hatobsession #hat #millinerymarket #millineryhire #derbyday #oaksday #fascinator #fascinatorhire #boaterhat #flowercrown
Jun 19

Black and pink percher with vintage flowers 🌸AU$380
Gorgeous and light to wear. Vintage cascading flowers, on pink crin swirl.
Available at www.millinerymarket.com/en/listings/555292
May 13

Mrs Orchid headpiece ✨ AU $330
Mrs Orchid fascinator will always stand out in the crowd. She features a fuchsia pink signature crest (with silver back) with hand made bubblegum pink and red orchids cascading down the right side of the face.
You can gently squeeze or stretch the headband to adjust to the tightness at which you would like to wear it. The small teeth at the front will hold it in place for all day wear.
Available at www.millinerymarket.com/en/listings/555192
Apr 29

Item 182 - Velvet Vision ❤️🖤 AU $375
A beautiful black pleated satin rear facing pillbox. Handcrafted red and green velvet flowers and leaves. Easy to wear with elastic and comb. Autumn/Winter millinery Essential.❤️ ❤️ ❤️
Available at www.millinerymarket.com/en/listings/555240
Apr 29

RUBY ❤️ AU $245
A stunning bright red lace wide brim hat. Designed to perch on the head to one side, making it a one size fits all piece. The hat measures 52cm in diameter.
Available at www.millinerymarket.com/en/listings/555202
Apr 24

Ivory and rose saucer hat 🤍 £190
Ivory sinamay saucer hat, 16 inch. Ivory statement feathers, with beautiful vintage inspired statement silk flowers. Attaches to the head via hairband.
Available at www.millinerymarket.com/en/listings/555255
Apr 24

Pink floral halo 💗 £190
Pink sinamay halo, pretty rose flower, leaf detail, matching feather and quill.
Available at www.millinerymarket.com/en/listings/555253
Apr 24

I’m your Lady padded headband SALE❣️ AU $80
Red velvet padded headband with 3 red leather hand crafted roses
RRP $125 SALE $80
Available at www.millinerymarket.com/en/listings/555229
Apr 22

Red and White Headband Headpiece ❤️🤍 AU $235
This elegant headband is the perfect finishing touch to an outfit.
This style flatters almost all ages and face shapes and is very comfortable to wear.
It measures approximately 43cm (17 inches) from end to end across the head and is approximately 8cm (3 inches) at its widest point.
It is positioned snuggly on the head with hat elastic and two small metal combs.
Available at www.millinerymarket.com/en/listings/555164
.
.
.
#millinery #hats #hathire #millinerysale #hatrental #hatsforsale #millinerylove #millinerydesign #hatlover #headwear #springracing #melbournecup #springcarnival #racedaystyle #fascinators #headpieces #hatsofinstagram #fashionheadwear #millinerytrends #hatobsession #hat #millinerymarket #millineryhire #derbyday #oaksday #fascinator #fascinatorhire #boaterhat #flowercrown
Apr 22

GINNI 🌟 AU $340
Ginni is your go to hat when you need that gold magic.
Dress her up or down, Ginni is a hand made gold sinimay hat blocked on an angled crown finished with a light weight chain detailing.
Secure Ginni your head with the comfortable elastic.
Available at www.millinerymarket.com/en/listings/555129
Apr 22

Scarlett ~ Multi 🌈 $53 US / Week Rental
Circular beret percher hat of colorful grosgrain ribbons, hand embroidered cross-stitches. This fascinator looks simple but was technically quite challenging to create. I made the fabric by interlacing ribbons, carefully measuring to the millimeter and then stitching to secure. Featured on the cover of Hatlines hat magazine, Winter 2021!
Measurements: 7.5 in diameter (19 cm)
Hat Box: 12 in
How to Wear: Worn on right side of forehead. Secures with custom headband and metal comb.
Available at www.millinerymarket.com/en/listings/555232
.
.
.
#millinery #hats #hathire #millinerysale #hatrental #hatsforsale #millinerylove #millinerydesign #hatlover #headwear #springracing #melbournecup #springcarnival #racedaystyle #fascinators #headpieces #hatsofinstagram #fashionheadwear #millinerytrends #hatobsession #hat #millinerymarket #millineryhire #derbyday #oaksday #fascinator #fascinatorhire #boaterhat #flowercrown
Apr 22

Iridescent handmade feather headpiece ✨ $310 AU
Hand cut iridescent feathers fitted to a tulle covered narrow headband.
Designed to be worn on the right hand side of the head.
Available at www.millinerymarket.com/en/listings/555172
.
.
.
#millinery #hats #hathire #millinerysale #hatrental #hatsforsale #millinerylove #millinerydesign #hatlover #headwear #springracing #melbournecup #springcarnival #racedaystyle #fascinators #headpieces #hatsofinstagram #fashionheadwear #millinerytrends #hatobsession #hat #millinerymarket #millineryhire #derbyday #oaksday #fascinator #fascinatorhire #boaterhat #flowercrown
Apr 21

Claudia Straw Boater 🖤 $620
The Claudia Boater features a tall square crown with short flat traditional style make from a patterned straw with petershame ribbon hat band.
This style is best made to order with your headfit and is helped to stay on the head with an elastic.
This piece is part of the Collins Spring Collection and is perfect for many occasions, select your Claudia Boater today.
The headpiece comes in other colours or can be custom-made in various colours. Contact us to find out more about customising this style. Please allow 2-4 weeks lead time for a custom order.
Available at www.millinerymarket.com/en/listings/554040
.
.
.
#millinery #hats #hathire #millinerysale #hatrental #hatsforsale #millinerylove #millinerydesign #hatlover #headwear #springracing #melbournecup #springcarnival #racedaystyle #fascinators #headpieces #hatsofinstagram #fashionheadwear #millinerytrends #hatobsession #hat #millinerymarket #millineryhire #derbyday #oaksday #fascinator #fascinatorhire #boaterhat #flowercrown
Oct 30

Sylvie - Green Halo Headpiece with Statement Flower 💚$339
Part of the SS23 Collection, this statement headpiece features a blocked straw crown with statement foam flower and two tulle wrapped halos, fastened by an elastic.
Available at www.millinerymarket.com/en/listings/554929
.
.
.
#millinery #hats #hathire #millinerysale #hatrental #hatsforsale #millinerylove #millinerydesign #hatlover #headwear #springracing #melbournecup #springcarnival #racedaystyle #fascinators #headpieces #hatsofinstagram #fashionheadwear #millinerytrends #hatobsession #hat #millinerymarket #millineryhire #derbyday #oaksday #fascinator #fascinatorhire#flowercrown #fotf #fashionsonthefield
Oct 24

Hepburn Halo in Pink & Red 🩷❤️ $210
Hot pink Straw blocked halo with one large leather red handcrafted rose.
Available at www.millinerymarket.com/en/listings/554947
.
.
.
#millinery #hats #hathire #millinerysale #hatrental #hatsforsale #millinerylove #millinerydesign #hatlover #headwear #springracing #melbournecup #springcarnival #racedaystyle #fascinators #headpieces #hatsofinstagram #fashionheadwear #millinerytrends #hatobsession #hat #millinerymarket #millineryhire #derbyday #oaksday #fascinator #fascinatorhire#flowercrown #fotf #fashionsonthefield
Oct 24

Taino - Fuchsia Button Base with Raspberry feather flower £220
A stunning Fuchsia sinamay button base sits under a delicate Raspberry handmade feather flower with a green ostrich quill for the stem and green diamond cut feathers for the leaves attached to a hat elastic so you can position anywhere on your head.. The fascinator does come supplied with a hat elastic NOT an Alice band.
Please note:- Handmade in the United Kingdom
Shipping UK £25
Shipping Rest of the World £130
Available at www.millinerymarket.com/en/listings/554874
.
.
.
#millinery #hats #hathire #millinerysale #hatrental #hatsforsale #millinerylove #millinerydesign #hatlover #headwear #springracing #melbournecup #springcarnival #racedaystyle #fascinators #headpieces #hatsofinstagram #fashionheadwear #millinerytrends #hatobsession #hat #millinerymarket #millineryhire #derbyday #oaksday #fascinator #fascinatorhire#flowercrown #fotf #fashionsonthefield
Oct 24

Poppy - Pink Vintage Straw Pillbox with Bow $329
Part of the SS23 Collection, this one-off design features a rear-sitting hand-blocked vintage raffia pillbox with handmade silk abaca bow, fastened by an elastic.
Available at www.millinerymarket.com/en/listings/554935
.
.
.
#millinery #hats #hathire #millinerysale #hatrental #hatsforsale #millinerylove #millinerydesign #hatlover #headwear #springracing #melbournecup #springcarnival #racedaystyle #fascinators #headpieces #hatsofinstagram #fashionheadwear #millinerytrends #hatobsession #hat #millinerymarket #millineryhire #derbyday #oaksday #fascinator #fascinatorhire#flowercrown #fotf #fashionsonthefield
Oct 24

Barbie💞 $200
Beautiful pink frayed edge hat
Ready for spring
Standard head size
Comes with elastic.
Available at www.millinerymarket.com/en/listings/555041
.
.
.
#millinery #hats #hathire #millinerysale #hatrental #hatsforsale #millinerylove #millinerydesign #hatlover #headwear #springracing #melbournecup #springcarnival #racedaystyle #fascinators #headpieces #hatsofinstagram #fashionheadwear #millinerytrends #hatobsession #hat #millinerymarket #millineryhire #derbyday #oaksday #fascinator #fascinatorhire#flowercrown #fotf #fashionsonthefield
Oct 24

Navy Blue Floral Hat - Victoria 💙 $330
A navy blue leather floral hat in a design exclusive to Reuben & Rose Millinery. Perfect for a racing event or fashions on the field competition.
Attached with hat elastic for a secure fit, one size fits all.
This purchase includes a complimentary hat box for storage.
Available at www.millinerymarket.com/en/listings/553335
.
.
.
#millinery #hats #hathire #millinerysale #hatrental #hatsforsale #millinerylove #millinerydesign #hatlover #headwear #springracing #melbournecup #springcarnival #racedaystyle #fascinators #headpieces #hatsofinstagram #fashionheadwear #millinerytrends #hatobsession #hat #millinerymarket #millineryhire #derbyday #oaksday #fascinator #fascinatorhire#flowercrown #fotf #fashionsonthefield
Oct 24

Black & White Houndstooth Pillbox Hat with Large Bow - Fleur $320
A black & white Houndstooth patterned Pillbox hat with a large bow. The classic pillbox shape is complemented by the striking Houndstooth pattern, adding a touch of sophistication and refinement. The large wired bow on top adds a glamorous touch, making this hat a statement piece.
Crafted with meticulous attention to detail, the Fleur hat is designed to provide a secure and comfortable fit. It is attached with hat elastic, ensuring it stays in place throughout the day. The one-size-fits-all design offers convenience and versatility, making it suitable for a wide range of head sizes.
Complete with a complimentary hat box, the Fleur hat is perfect for special occasions.
Available at www.millinerymarket.com/en/listings/554712
.
.
.
#millinery #hats #hathire #millinerysale #hatrental #hatsforsale #millinerylove #millinerydesign #hatlover #headwear #springracing #melbournecup #springcarnival #racedaystyle #fascinators #headpieces #hatsofinstagram #fashionheadwear #millinerytrends #hatobsession #hat #millinerymarket #millineryhire #derbyday #oaksday #fascinator #fascinatorhire #boaterhat #flowercrown
Oct 17

White Rose Headband🤍 US$140
A rambling rose gracefully winds itself around this blush tinalak headband. The sparkling stem adds a beautiful eye-catching effect. Dramatic and elegant, this versatile piece is ready for your next event!
Available at www.millinerymarket.com/en/listings/554767
.
.
.
#millinery #hats #hathire #millinerysale #hatrental #hatsforsale #millinerylove #millinerydesign #hatlover #headwear #springracing #melbournecup #springcarnival #racedaystyle #fascinators #headpieces #hatsofinstagram #fashionheadwear #millinerytrends #hatobsession #hat #millinerymarket #millineryhire #derbyday #oaksday #fascinator #fascinatorhire #boaterhat #flowercrown
Oct 17

❤️Lady in Red❤️ $400
Lady in Red, is percher style hat Dior inspired and the trim is a wrapped raffia straw wire swirl with a feather tail. From simplicity to elegant.
Attachment for this piece is and elastic and comb to be secure to the head.
Available at www.millinerymarket.com/en/listings/554769
.
.
.
#millinery #hats #hathire #millinerysale #hatrental #hatsforsale #millinerylove #millinerydesign #hatlover #headwear #springracing #melbournecup #springcarnival #racedaystyle #fascinators #headpieces #hatsofinstagram #fashionheadwear #millinerytrends #hatobsession #hat #millinerymarket #millineryhire #derbyday #oaksday #fascinator #fascinatorhire #boaterhat #flowercrown
Oct 17


